How to install Android 5.0 Lollipop on a Nexus 4


Because it can take a while for over-the-air (OTA) updates to land on phones, we're here to help out. Though the Nexus 4 Android 5.0 Lollipop update should be arriving around the world right now, you still might not be able to get your hands on it just yet. Find out how to install Android 5.0 Lollipop on your Nexus 4 right now in our guide.
Warning: Before you begin this process, you should be aware that installing a factory image will wipe all of the data on your Nexus 4. As such, make sure that you have completely backed up everything you do not want to lose so you can restore it when the installation completes.
Requirements
You will need a few things to start with:
- ADB tools and driver (download from AndroidPIT)
- Factory image for Nexus 4:
Extract the files onto your computer once downloaded.
Unlock bootloader
If you have already unlocked the bootloader of your Nexus 4 then you can skip this step, but if not, here's how to do it:
- Turn off your Nexus 4.
- Press and hold Volume Down and Power to enter the Fastboot menu.
- Connect the Nexus 4 to your computer via USB cable.
- Go into the adb-tools folder and hold the Shift key on your keyboard then click the right mouse button on any free area of white space in the Windows Explorer window. Select ''Open Command Window Here'' with your left mouse button.
- Once the command window is open, enter the following command to unlock the bootloader:
fastboot oem unlock
- Press the Volume Up button on the Nexus 4 to accept the command and press the Power button to confirm. The bootloader will now be unlocked, and all data will be lost.
Install Factory Image
- Get your Nexus 4 into Fastboot by turning it off and pressing Volume Down and Power until Fastboot appears.
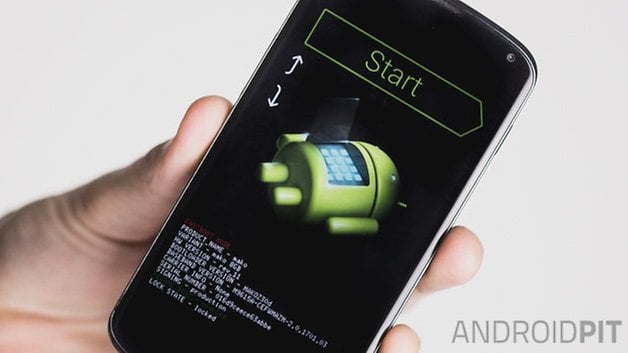
Put your Nexus 4 into Fastboot to install Android 5.0 Lollipop. / © ANDROIDPIT
- Connect the Nexus 4 to your computer with a USB cable.
- On your computer, navigate to the unpacked directory that contains the factory image for your device.
- Double click the flash-all.bat file and wait until the installation is finished. Your Nexus will reboot itself after completion.
Troubleshooting
If your Nexus 4 gets stuck in a bootloop at the Google logo on startup, do the following:
- Disconnect your Nexus 4 from your computer and turn it off.
- Press and hold the Volume Down and Power button to enter Fastboot.
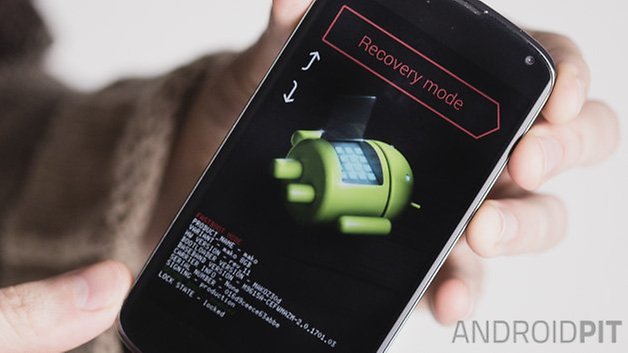
- Use the volume buttons to highlight Recovery Mode and press Power to confirm
- If you have a custom recovery like CWM you'll enter it immediately. If you see the Android laying on its back just press the Power button and Volume Up button briefly to enter stock Recovery.
- In the recovery menu, use the volume buttons to highlight wipe cache partition and press Power to confirm.
- Scroll down to wipe data/factory reset and press Power to confirm. Reconfirm your seelction and let your Nexus reset.
- If your Nexus doesn't reboot automatically you can select reboot sytem now from the menu and hit Power to confirm.
That's all there is to it. Your Nexus 4 should now boot successfully. Note that the very first boot process takes several minutes by the way, so do not be surprised if it takes longer than what seems usual. If you want to downgrade your Nexus to an older version of Android instead, you can do so at the link.
Have you manually upgraded to Android 5.0 Lollipop?


Thank you guys, Great job keep it up. U really helped me when i was in very critical situation.. Now my phone is working perfectly.. Two ThUmBsUp for helping me .. : ) : )
i can't found flash-all.bat file, help
Hi... I was able to do as you instructed but I'm curious since I unlock my phone after the upgrade process does the phone get locked again or does it need to be done and if so, how ?
there seems to be a problem in the flash-all script by google apparently they are not rebooting after flashing the new bootloader. if you run into this problem try running these commands
fastboot reboot-bootloader
fastboot flash bootloader bootloader-mako-makoz30f.img
fastboot reboot-bootloader
fastboot flash radio radio-mako-m9615a-cefwmazm-2.0.1701.04.img
fastboot reboot-bootloader
fastboot update image-occam-lrx21t.zip
should work you may also have to put the full path to fastboot.exe if you don't have your comp setup for android development
just upgraded last night and getting to grips with it all. So far so good but will see how things are 24-48 hours in. A very different feel to KitKat!
so far battery does seem better but could also be due to the factory reset & cleaning things up. Phone runs just as smooth as before under Kk
There is a flashable zip file on XDA, you can update to stock Lollipop via TWRP