ElaineZhao
- Forum posts: 1
Aug 10, 2012, 8:00:40 AM via Website
Aug 10, 2012 8:00:40 AM via Website
Android is a Linux-based operating system for mobile devices such as smartphones and tablet computers. Android became the world's leading smartphone platform at the end of 2010. For the first quarter of 2012, Android had a 59% smartphone market share worldwide. At the half of 2012, there were 400 million devices activated and 1 million activations per day. Analysts point to the advantage to Android of being a multi-channel, multi-carrier OS.
If you have purchased lots of songs from iTunes Store, you may want to transfer them to your Android device without paying for them twice. However, iTunes music cannot be directly transferred to any Android Phone or Tablet PC due to the Apple DRM copy protection. This article is going to demonstrate how to sync iTunes music with Android devices in two different ways.
1. Transfer iTunes music to Android devices using doubleTwist
a. Download and install doubleTwist. Launch the application.
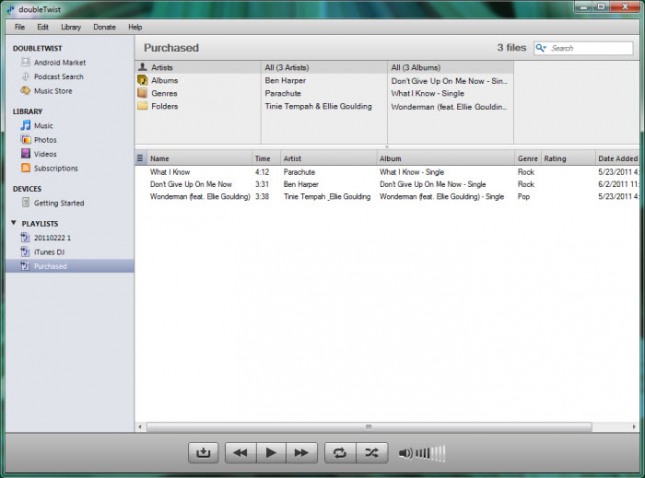
b. Click "Library -> Import iTunes Playlists" to add the playlists in your iTunes library.
c. Connect your Android device to computer via a cable and enable USB Mass Storage Mode on your device.
d. Drag and drop the playlist to your Android device in the "DEVICES" panel and start syncing. For instance, if you want to transfer the music tracks you purchased from iTunes store to your device, just drag and drop the playlist named "Purchased" to your device and start syncing.
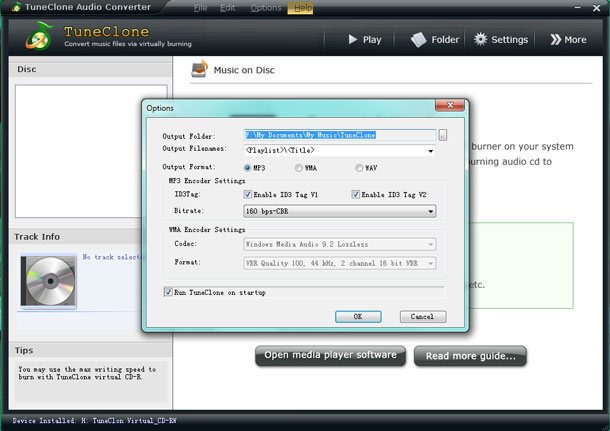
2. Convert iTunes music to MP3 for Android devices with TuneClone
a. Download Tuneclone and install it.
b. Launch TuneClone. Click the "Settings" tab. In the pop-up window, you can specify output folder, output file name format, output format, etc for the output files.
c. Create a new playlist in iTunes and add iTunes music to the playlist.
d. In iTunes, Right click the playlist you just created and choose "Burn Playlist to Disc".
e. In the pop-up window of "Burn Settings", select "TuneClon Virtual_CD-RW" from the "CD Burner" drop-down list, click the radio button next to "Audio CD" and tick "Include CD Text" option. Click "Burn" to start burning.
f. Upon the completion of burning the disc and encoding the music, you can open the TuneClone manager screen to show all the converted music files. To locate the output folder, simply click the "Folder" tab on the interface.
g. Connect your phone to computer via a cable and enable USB Mass Storage Mode on your device. Then you can transfer the output files to your device from the output folder.
P.S. Android supports the following audio/video/still media formats:
WebM, H.263, H.264 (in 3GP or MP4 container), MPEG-4 SP, AMR, AMR-WB (in 3GP container), AAC, HE-AAC (in MP4 or 3GP container), MP3, MIDI, Ogg Vorbis, FLAC, WAV, JPEG, PNG, GIF, BMP, WebP.
If you have purchased lots of songs from iTunes Store, you may want to transfer them to your Android device without paying for them twice. However, iTunes music cannot be directly transferred to any Android Phone or Tablet PC due to the Apple DRM copy protection. This article is going to demonstrate how to sync iTunes music with Android devices in two different ways.
1. Transfer iTunes music to Android devices using doubleTwist
a. Download and install doubleTwist. Launch the application.
b. Click "Library -> Import iTunes Playlists" to add the playlists in your iTunes library.
c. Connect your Android device to computer via a cable and enable USB Mass Storage Mode on your device.
d. Drag and drop the playlist to your Android device in the "DEVICES" panel and start syncing. For instance, if you want to transfer the music tracks you purchased from iTunes store to your device, just drag and drop the playlist named "Purchased" to your device and start syncing.
2. Convert iTunes music to MP3 for Android devices with TuneClone
a. Download Tuneclone and install it.
b. Launch TuneClone. Click the "Settings" tab. In the pop-up window, you can specify output folder, output file name format, output format, etc for the output files.
c. Create a new playlist in iTunes and add iTunes music to the playlist.
d. In iTunes, Right click the playlist you just created and choose "Burn Playlist to Disc".
e. In the pop-up window of "Burn Settings", select "TuneClon Virtual_CD-RW" from the "CD Burner" drop-down list, click the radio button next to "Audio CD" and tick "Include CD Text" option. Click "Burn" to start burning.
f. Upon the completion of burning the disc and encoding the music, you can open the TuneClone manager screen to show all the converted music files. To locate the output folder, simply click the "Folder" tab on the interface.
g. Connect your phone to computer via a cable and enable USB Mass Storage Mode on your device. Then you can transfer the output files to your device from the output folder.
P.S. Android supports the following audio/video/still media formats:
WebM, H.263, H.264 (in 3GP or MP4 container), MPEG-4 SP, AMR, AMR-WB (in 3GP container), AAC, HE-AAC (in MP4 or 3GP container), MP3, MIDI, Ogg Vorbis, FLAC, WAV, JPEG, PNG, GIF, BMP, WebP.
— modified on Aug 14, 2012, 3:59:41 PM by moderator
Recommended editorial content
With your consent, external content is loaded here.
By clicking on the button above, you agree that external content may be displayed to you. Personal data may be transmitted to third-party providers in the process. You can find more information about this in our Privacy Policy.