
Loie Favre
- Forum posts: 877
Jul 3, 2013, 4:16:49 PM via Website
Jul 3, 2013 4:16:49 PM via Website
Warning
Rooting can entail many risks and if you don't follow the instructions carefully, you may cause serious damage to your phone et end up with a useless brick. Nonetheless, there's generally no loss of data with this method, but to be on the safe side of things, it's better to do a complete backup of all of your files. Nor AndoridPIT nor I will take responsbility for any resulting losses or damages.
This procedure is for the Samsung Galaxy S GT-i90000 only! Do NOT try this with another model.
Choose the correct CF Root
In order to do this, you'll need to go to your phone's settings, then in ''About device''. The two pieces of important information are found under the Android version and the build number. Choose the version that corresponds to the build number. Like in my case, if you cannot find the exact version (NEJVE), you can try to the procedure with a similar version (NEE_JVH) which i managed to do successfully. Again, this is at your own risk.
Prerequisites
Install the Samsung Galaxy S GT-i9000 drivers by downloading Samsung Kies. Don't forget to exit Kies before launching Odin.
Allow Windows enough time to recognize your smartphone
Charge your smartphone until it's at least 50% full.
Download
Odin 1.83 https://www.wuala.com/sgsdownload/odin183.zip/?key=3lsHeXHxSGk7
Root Files
Android 2.2.1
CF-Root-JPH CF-Root-JPH-v1.1.zip
CF-Root-JPK CF-Root-JPK-v1.1.zip
CF-Root-JP6 cf-root-jp6-v1.2-busybox-1.15.3.zip
CF-Root-JPM CF-Root-JPM-v1.2-Busybox-1.17.1.zip
CF-Root-XX_XEU_JPO CF-Root-XX_XEU_JPO-v1.2-Busybox-1.17.1.zip
CF-Root-XW_XEE_JPA CF-Root-XW_XEE_JPA-v1.2-Busybox-1.17.1.zip
CF-Root-XX_OXA_JPU CF-Root-XX_OXA_JPU-v1.3-BusyBox-1.17.1.zip
CF-Root-XX_XEU_JPX CF-Root-XX_XEU_JPX-v1.3-BusyBox-1.17.1.zip
CF-Root-XX_XEU_JPY CF-Root-XX_XEU_JPY-v1.3-BusyBox-1.17.1.zip
CF-Root-XW_OXF_JS2 CF-Root-XW_OXF_JS2-v1.3-BusyBox-1.17.1.zip
CF-Root-XW_XEN_JS5 CF-Root-XW_XEN_JS5-v1.3-BusyBox-1.17.1.zip
CF-Root-XX_DBT_JQ3 CF-Root-XX_DBT_JQ3-v1.3-BusyBox-1.17.1.zip
CF-Root-XW_XEE_JS7 CF-Root-XW_XEE_JS7-v1.3-BusyBox-1.17.1.zip
CF-Root-XW_NEE_JS8 CF-Root-XW_NEE_JS8-v1.3-BusyBox-1.17.1.zip
Android 2.3.2
CF-Root-XW_OXX_JV1 CF-Root-XW_OXX_JV1-v1.3-BusyBox-1.17.1_NO-CWM.zip
Android 2.3.3
CF-Root-XX_OXA_JVK CF-Root-XX_OXA_JVK-v2.7-CWM3RFS.zip
CF-Root-XW_XEE_JVB CF-Root-XW_XEE_JVB-v3.1-CWM3RFS.zip
CF-Root-XX_OXA_JVO CF-Root-XX_OXA_JVO-v3.2-CWM3RFS.zip
CF-Root-XW_NEE_JVH CF-Root-XW_NEE_JVH-v3.2-CWM3RFS.zip
The procedure
1. Download and decompress Odin 1.83 as well as the correct CF-Root
2. Put your Galaxy S into Download mode by pressing on the power, home and volume down buttons.
3. Connect your Galaxy S2 to your computer via your micro USB cable.
4. Launch Odin. You should see a small yellow rectangular box appear in the top left corner in Odin.
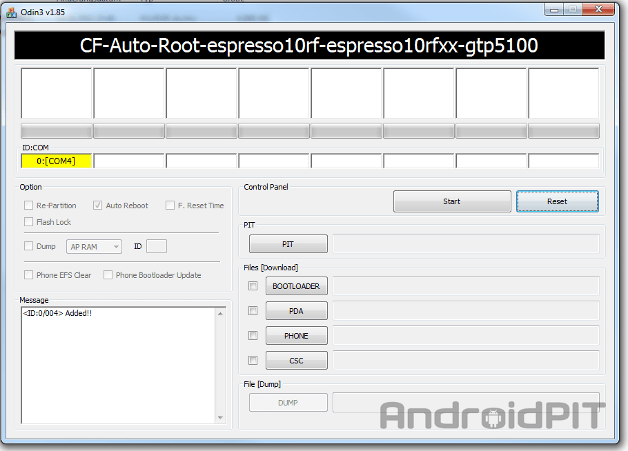
5. In Odin, click on PDA and then select the kernel file that you have downloaded from the list above. Before going any further, make sure that no other boxes are checked off other than the ones you see on the screen (Auto Reboot and F. Reset Time). The procedure won't work if you check off any other boxes.
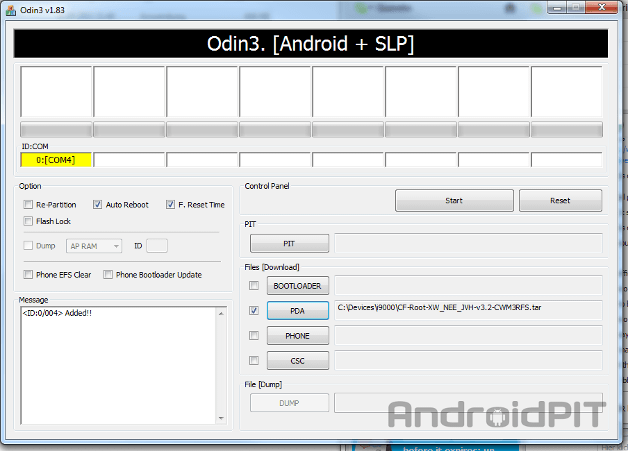
6. Click on start.
7. After a few minutes, Odin will state ''Pass!''

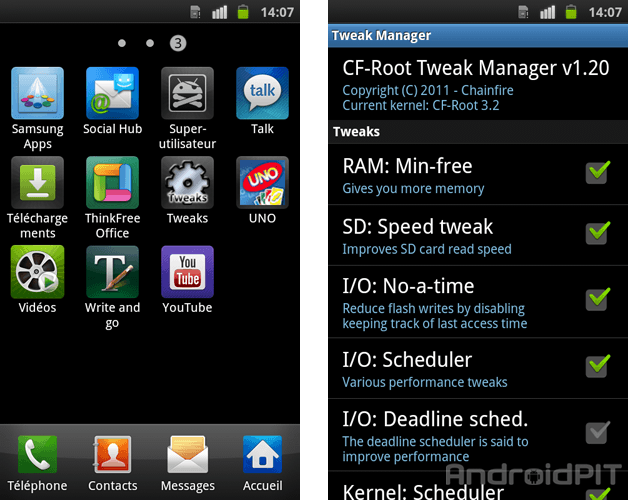
Congratulations! Your Samsung Galaxy S is officially rooted.
Verify that the two applications Super User as well as Tweaks are installed.
Rooting can entail many risks and if you don't follow the instructions carefully, you may cause serious damage to your phone et end up with a useless brick. Nonetheless, there's generally no loss of data with this method, but to be on the safe side of things, it's better to do a complete backup of all of your files. Nor AndoridPIT nor I will take responsbility for any resulting losses or damages.
This procedure is for the Samsung Galaxy S GT-i90000 only! Do NOT try this with another model.
Choose the correct CF Root
In order to do this, you'll need to go to your phone's settings, then in ''About device''. The two pieces of important information are found under the Android version and the build number. Choose the version that corresponds to the build number. Like in my case, if you cannot find the exact version (NEJVE), you can try to the procedure with a similar version (NEE_JVH) which i managed to do successfully. Again, this is at your own risk.
Prerequisites
Install the Samsung Galaxy S GT-i9000 drivers by downloading Samsung Kies. Don't forget to exit Kies before launching Odin.
Allow Windows enough time to recognize your smartphone
Charge your smartphone until it's at least 50% full.
Download
Odin 1.83 https://www.wuala.com/sgsdownload/odin183.zip/?key=3lsHeXHxSGk7
Root Files
Android 2.2.1
CF-Root-JPH CF-Root-JPH-v1.1.zip
CF-Root-JPK CF-Root-JPK-v1.1.zip
CF-Root-JP6 cf-root-jp6-v1.2-busybox-1.15.3.zip
CF-Root-JPM CF-Root-JPM-v1.2-Busybox-1.17.1.zip
CF-Root-XX_XEU_JPO CF-Root-XX_XEU_JPO-v1.2-Busybox-1.17.1.zip
CF-Root-XW_XEE_JPA CF-Root-XW_XEE_JPA-v1.2-Busybox-1.17.1.zip
CF-Root-XX_OXA_JPU CF-Root-XX_OXA_JPU-v1.3-BusyBox-1.17.1.zip
CF-Root-XX_XEU_JPX CF-Root-XX_XEU_JPX-v1.3-BusyBox-1.17.1.zip
CF-Root-XX_XEU_JPY CF-Root-XX_XEU_JPY-v1.3-BusyBox-1.17.1.zip
CF-Root-XW_OXF_JS2 CF-Root-XW_OXF_JS2-v1.3-BusyBox-1.17.1.zip
CF-Root-XW_XEN_JS5 CF-Root-XW_XEN_JS5-v1.3-BusyBox-1.17.1.zip
CF-Root-XX_DBT_JQ3 CF-Root-XX_DBT_JQ3-v1.3-BusyBox-1.17.1.zip
CF-Root-XW_XEE_JS7 CF-Root-XW_XEE_JS7-v1.3-BusyBox-1.17.1.zip
CF-Root-XW_NEE_JS8 CF-Root-XW_NEE_JS8-v1.3-BusyBox-1.17.1.zip
Android 2.3.2
CF-Root-XW_OXX_JV1 CF-Root-XW_OXX_JV1-v1.3-BusyBox-1.17.1_NO-CWM.zip
Android 2.3.3
CF-Root-XX_OXA_JVK CF-Root-XX_OXA_JVK-v2.7-CWM3RFS.zip
CF-Root-XW_XEE_JVB CF-Root-XW_XEE_JVB-v3.1-CWM3RFS.zip
CF-Root-XX_OXA_JVO CF-Root-XX_OXA_JVO-v3.2-CWM3RFS.zip
CF-Root-XW_NEE_JVH CF-Root-XW_NEE_JVH-v3.2-CWM3RFS.zip
The procedure
1. Download and decompress Odin 1.83 as well as the correct CF-Root
2. Put your Galaxy S into Download mode by pressing on the power, home and volume down buttons.
3. Connect your Galaxy S2 to your computer via your micro USB cable.
4. Launch Odin. You should see a small yellow rectangular box appear in the top left corner in Odin.
5. In Odin, click on PDA and then select the kernel file that you have downloaded from the list above. Before going any further, make sure that no other boxes are checked off other than the ones you see on the screen (Auto Reboot and F. Reset Time). The procedure won't work if you check off any other boxes.
6. Click on start.
7. After a few minutes, Odin will state ''Pass!''
Congratulations! Your Samsung Galaxy S is officially rooted.
Verify that the two applications Super User as well as Tweaks are installed.
— modified on Jul 3, 2013, 4:28:36 PM
Forum Rules - Recommended for new AndroidPIT members! Important to all community members: please read before posting
Recommended editorial content
With your consent, external content is loaded here.
By clicking on the button above, you agree that external content may be displayed to you. Personal data may be transmitted to third-party providers in the process. You can find more information about this in our Privacy Policy.